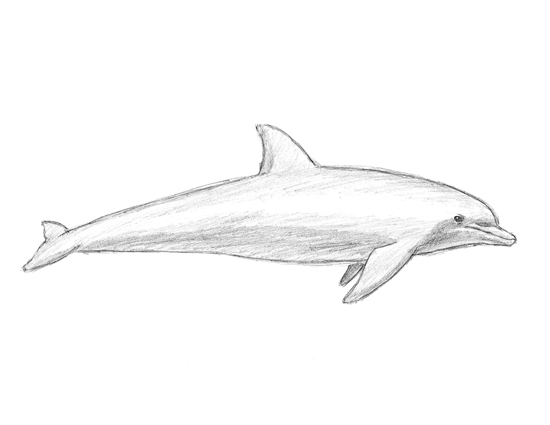
Dolphin
How to Draw a Dolphin
Please PAUSE the video after each step to draw at your own pace (scroll down to see the final dolphin drawing).
For the first few steps, don’t press down too hard with your pencil. Use light, smooth strokes to begin.
Step 1: Draw a long, narrow oval as a guide for the dolphin’s body. It doesn’t have to be perfect. It’s just a guide.
Step 2: On the right side of the oval draw an arc as a guide for the dolphin’s head.
Step 3: On the lower right side of the arc, draw a smaller, thinner arc as a guide for the dolphin’s mouth.
Step 4: On top of the body, draw a triangular shape as a guide for the dolphin’s dorsal fin.
Step 5: Under the dolphin’s body, closer to the head, draw a thinner triangular shape as a guide for the flipper.
Step 6: On the far left side of the body, draw yet another triangle as a guide for the dolphin’s tail or flukes. Pay close attention to the placement of the last triangle. If you place it too far, your dolphin will be long. Too close and the dolphin will be short.
Step 7: Draw a couple of lines that connect the flukes to the main part of the dolphin’s body.
That’s it for the initial sketch! From this point on, press harder with your pencil to get a more defined sketch.
Step 8: Draw the dolphin’s eye near the back of the head. The eye is roughly the shape of an oval. Shade it in and leave a small circle unshaded to represent glare. Draw a few lines around the dolphin’s eye for extra detail.
Step 9: Use the initial arc as a guide to draw in the dolphin’s mouth. Follow the basic shape of the arc. Draw the mouth as a line that curves and extends toward the inside of the head, near the eye. Draw another line above the dolphin’s mouth and darken the bottom part to finish off the beak-like mouth.
Step 10: Draw the dolphin’s head using the big arc as a guide. Make the head a bit thinner on the bottom and darken the top part.
Step 11: Using the triangle as a guide, draw the dolphin’s flippers. The flipper should curve more and the base should bend toward the inside of the body. Draw the flipper on the other side of the dolphin’s body by drawing a small curved line to the left.
Step 12: Draw the dolphin’s dorsal fin by using the other triangle as a guide. Curve the shape back a bit.
Step 13: Use the last triangle as a guide to draw the dolphin’s flukes. Draw a curved line on the bottom and a curved line on top. Then join them together at a point near the middle.
Step 14: Use the remaining lines as guides to draw the rest of the dolphin’s body. Simply darken the outer lines to create that sleek slender dolphin shape.
Step 15 (Optional): You can stop here for a sketchy look or erase as much as you can of the initial guide lines for a cleaner look. Don’t worry about erasing all of them. It’s okay to leave some behind. Also re-draw any of the final lines you may have accidentally erased.
Step 16 (Optional): Add some shading to give your dolphin drawing more dimension and volume. Pick the direction of the light source when shading so that the shadows are consistent with it.
Step 17 (Optional): You can add more value throughout your drawing for extra detail. Vary the pressure on your pencil to get different degrees of tonal value.