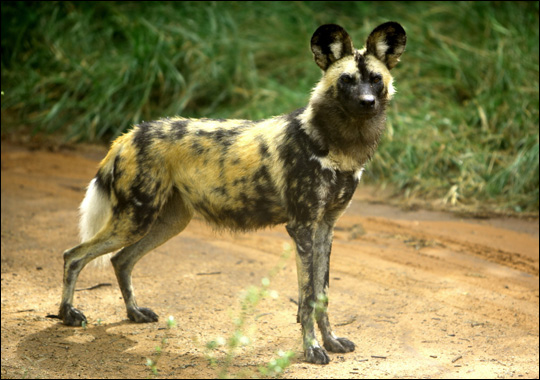
Dog (Labrador Retriever)... How to Draw a Dog (Labrador Retriever) Please PAUSE the video after each step to draw at your own pace (scroll down to see the final labrador retriever drawing). For the first few steps, don’t press down too hard with your pencil. Use light, smooth strokes to begin Step 1: Draw two circles next to each other as a guide for the labrador’s body. One circle should be a bit bigger than the other, and they don’t have to be perfect. They’re just guides. Step 2: Draw a guide for the dog’s head above and to the right of the bigger circle. The guide for the head is just a smaller circle with an arc to the right of it. Step 3: Draw in the rest of the lab’s body by connecting all the shapes with a few lines. Step 4: Draw guides for...
more info
delete
1 Star2 Stars3 Stars4 Stars5 Stars (1 votes, average: 3.00 out of 5)
Loading...
rate this post
0
date read more
Dog (Husky) How to Draw a Dog (Husky) Please PAUSE the video after each step to draw at your own pace (scroll down to see the final husky drawing). For the first few steps, don’t press down too hard with your pencil. Use light, smooth strokes to begin. Step 1: Draw two circles as guides for the husky’s body. They don’t have to be perfect. They’re just guides. Instead, pay attention to the space between the circles. If they’re too far apart, the husky dog will be too long. The circle on the right should be a bit smaller than the one on the left. Step 2: Draw another circle on the upper left side as a guide for the husky dog’s head. This circle should be even smaller, and its edge should touch the other circle slightly. Step 3: Draw two intersecting lines inside the...
more info
delete
1 Star2 Stars3 Stars4 Stars5 Stars (1 votes, average: 5.00 out of 5)
Loading...
rate this post
0
date read more
Dog (Dachshund) How to Draw a Dog (Dachshund) Please PAUSE the video after each step to draw at your own pace (scroll down to see the final dachshund drawing). For the first few steps, don’t press down too hard with your pencil. Use light, smooth strokes to begin. Step 1: Draw two circles as guides for the dachshund’s body. They don’t have to be perfect. They’re just guides. The circle on the left should be smaller. Also pay close attention to the spacing of the circles. The farther apart the circles are, the longer your dog will be. Step 2: Draw another circle on the top left side as a guide for the dachshund’s head. The circle should be slightly smaller and floating just above the dog’s body. Step 3: Draw a vertical line that splits the dog’s head in half as a guide for the...
more info
delete
1 Star2 Stars3 Stars4 Stars5 Stars (1 votes, average: 3.00 out of 5)
Loading...
rate this post
0
date read more
Dog Chihuahua How to Draw a Chihuahua Please PAUSE the video after each step to draw at your own pace. For the first few steps, don’t press down too hard with your pencil. Use light, smooth strokes to begin. Step 1: Draw two circles as guides for the chihuahua’s body. They don’t have to be perfect. They’re just guides. Instead, pay attention to the space between the circles. If they’re too far apart, the chihuahua dog will be too long. The circle on the right should be a bit smaller than the one on the left. Step 2: Draw another circle on the upper left side as a guide for the chihuahua’s head. This circle should be about the same size as the second circle, and its edge should almost touch the first circle. Step 3: Draw two intersecting lines inside the head to help you...
more info
delete
1 Star2 Stars3 Stars4 Stars5 Stars (1 votes, average: 2.00 out of 5)
Loading...
rate this post
0
date read more
Tailed Deer How to Draw a White-Tailed Deer Please PAUSE the video after each step to draw at your own pace (scroll down to see the final white-tailed deer drawing). For the first few steps, don’t press down too hard with your pencil. Use light, smooth strokes to begin. Step 1: Draw two circles as guides for the white-tailed deer’s body. They don’t have to be perfect. They’re just guides. Step 2: Draw a triangle with rounded corners on the top right side as a guide for the deer’s head. Step 3: Inside, draw two intersecting lines to help you place the deer’s facial features later. Step 4: Draw two arcs on top of the head as guides for the deer’s ears. Step 5: Draw two curved lines on top of the deer’s head as guides for the antlers. Step 6: Draw a series of curved...
more info
delete
1 Star2 Stars3 Stars4 Stars5 Stars (1 votes, average: 4.00 out of 5)
Loading...
rate this post
0
date read more

« Older Entries Next Entries »