

 (1 votes, average: 3.00 out of 5)
How to Draw a Spider
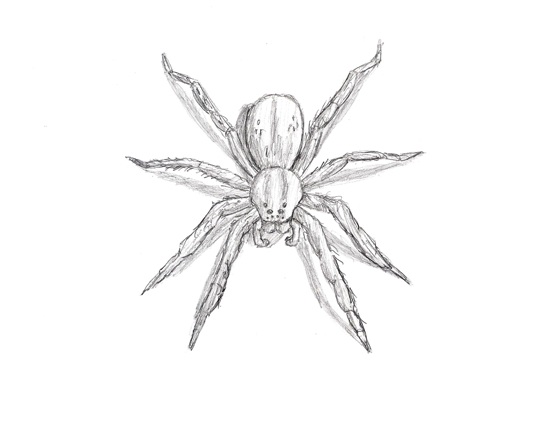
Please PAUSE the video after each step to draw at your own pace (scroll down to see the final spider drawing).
For the first few steps, don’t press down too hard with your pencil. Use light, smooth strokes to begin.
Step 1: Draw a small circle as a guide for the spider’s head/thorax or cephalothorax. It doesn’t have to be perfect. It’s just a guide.
Step 2: Above the circle, draw an oval as a guide for the spider’s abdomen. Again, it’s only a guide, so don’t worry about making it perfect.
Step 3: Draw four lines pointing down below the circle as guides for the first four legs. Bend the lines slightly at the base and try to make them the same size on either side. The size of the line will dictate the size of the spider’s legs later. The longer the lines, the longer the legs.
Step 4: Draw four lines above the first four as guides for the spider’s remaining legs. Remember to bend the lines slightly and to make them equal in size on either side.
That’s it for the initial sketch! From this point on, press harder with your pencil for a more defined sketch.
Step 5: Use the initial circle as a guide to draw the spider’s cephalothorax. Modify the shape so that it’s thicker on top and then tapers in toward the bottom.
Step 6: Draw the spider’s eyes on the bottom part of the cephalothorax. Draw the spider’s eyes as tiny circles and shade them in. Leave a portion unshaded to represent shine. Spiders usually have eight eyes arranged in different ways.
Step 7: Draw the spider’s fangs or chelicerae at the bottom part of the circle. The chelicerae are just two curved lines similar to the letter U next to each other.
Step 8: Draw the spider’s appendages that aid in food ingestion (pedipalps) on either side of the chelicerae. Draw the pedipalps as thick lines curving down. Remember to pause the video if you need to. In arachnids like scorpions, the pedipalps are the spider’s claws.
Step 9: Use the initial oval as a guide to draw the spider’s abdomen and attach it to the cephalothorax.
Step 10: Using the initial lines as guides, draw the spider’s four lower legs. Follow the line around to make the leg thicker. Use bumps throughout the spider’s leg instead of straight lines to create the different segments. Draw the spider’s other legs the same way. Have the end of each leg come to a point. All of the legs are attached to the cephalothorax, so try to squeeze them all in there.
Step 11: Draw the spider’s remaining legs using the initial lines as guides. Don’t forget to used curved and not straight lines to create the different leg segments. When you draw the end of one of the spider’s legs, have the point angle out a bit to indicate the support.
Step 12 (optional): You can stop here for a sketchy look or erase as much as you can of the initial lines for a cleaner look. Don’t worry about erasing all of the guides. It’s okay to leave some behind. Also re-draw any of the final lines you accidentally erase.
Step 13 (optional): You can add some shading to give your drawing more dimension and volume. Pick the direction of the light source when shading so that the shadows are consistent with it.
Step 14 (optional): Add a cast shadow underneath the spider. Or draw a vertical line coming from the spider’s abdomen to have it hanging down.
Step 15 (optional): You can add more value throughout your spider drawing for extra detail. It’s a good idea to use reference to be as accurate as possible. Vary the pressure on your pencil to get different degrees of tonal value.