
 (5 votes, average: 4.20 out of 5)
How to Draw a Snake (King Cobra)
Please PAUSE the video after each step to draw at your own pace (scroll down to see the final king cobra snake drawing).
For the first few steps, don’t press down too hard with your pencil. Use light, smooth strokes to begin.
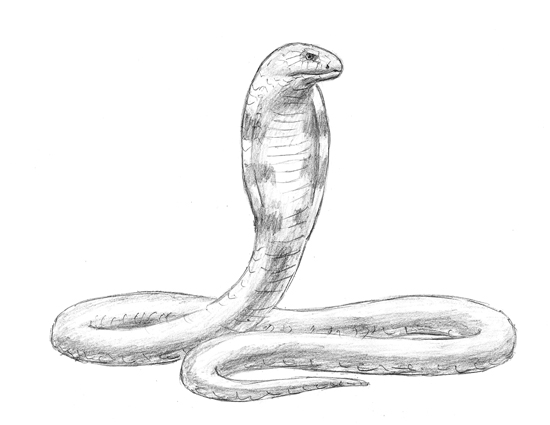
Step 1: Draw a small oval as a guide for the cobra’s head. It doesn’t have to be perfect. It’s just a guide.
Step 2: Below the snake’s head, draw a bigger oval with the top part missing. This will be a guide for the expanded hood.
Step 3: Draw a line below the hood as a guide for the body of the snake. The way you draw the line is the shape the snake’s body will take. Draw it coiling toward the front like this or just straight back to make it easier.
That’s it for the initial sketch! From this point on, press harder with your pencil to get a more defined sketch.
Step 4: Draw the eye on the top part of the snake’s head. The eye consists of a circle with a line on top of it. Inside is another shaded circle for the pupil.
Step 5: Draw the snake’s nasal pit and mouth on the right side of the head. Draw a small line for the pit and a longer, curved line that extends toward the back of the head for the snake’s mouth.
Step 6: Use the initial oval shape as a guide to draw the rest of the snake’s head. Make it dip lower toward the mouth and draw a few lines under the snake’s jaw.
Step 7: Use the oval below the head as a guide to draw the extended hood. King cobra snakes generally have a thin hood, but you can draw yours as wide as you like. Draw a couple of curved lines within the snake’s hood to add structure.
Step 8: Use the initial line as a guide to draw the rest of the snake’s body. Simply follow the line and make the body thicker. If you drew a straight line initially, the snake’s body will be easier to draw. You can also draw the body of your snake as thin or as thick as you want. Remember to pause the video if you need help completing the snake’s body.
Step 9 (optional): You can finish here for a sketchy look or erase as much as you can of the initial guide lines for a cleaner look. Don’t worry about erasing all the guides. It’s okay to leave some behind.
Step 10 (optional): Add some shading to give your king cobra snake drawing more dimension and volume. Pick the direction of the light source when shading so that the shadows are consistent with it. Vary the pressure on your pencil to get your different degrees of tonal value. You can leave a portion of the snake’s body unshaded to represent the sheen of the scales.
Step 11 (optional): You can add more value throughout your snake drawing for extra detail. It’s a good idea to use reference to be as accurate as possible.
Step 12 (optional): You can draw a few more lines throughout your drawing as extra detail for the snake’s scales. Again you can use reference for accuracy if you’d like. Otherwise just draw a few lines throughout the cobra’s body.