 (1 votes, average: 5.00 out of 5)
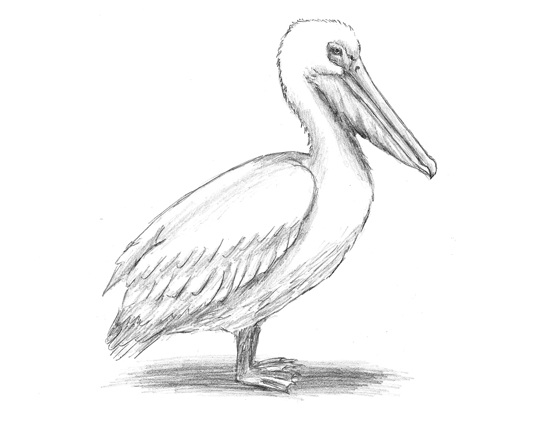
How to Draw a Pelican
Please PAUSE the video after each step to draw at your own pace (scroll down to see the final pelican drawing).
For the first few steps, don’t press down too hard with your pencil. Use light, smooth strokes to begin.
Step 1: Draw an oval tilted on its side as a guide for the pelican’s body. It doesn’t have to be perfect. It’s just a guide.
Step 2: Draw a small circle above and to the right of the oval as a guide for the pelican’s head.
Step 3: Using two curved lines, connect the circle to the oval and form the pelican’s neck.
Step 4: Draw a line next to the pelican’s head as a guide for the long beak.
Step 5: Below the body, draw an angled line as a guide for the pelican’s feet.
That’s it for the initial sketch! From this point on, press harder with your pencil to get a more defined sketch.
Step 6: Draw the eye inside the pelican’s head. The eye is very small and it resembles the shape of an over-inflated football. Draw a circle inside the football and shade it in for the pupil. Also draw a few lines surrounding it for extra detail.
Step 7: Draw the pelican’s head using the initial circle as a guide. Start by using quick, short strokes to surround the eye, then continue using the strokes to create the rest of the head. The quick short stokes represent the fine feathers of the pelican.
Step 8: Use the initial line as a guide to draw the pelican’s beak. Darken the line, which becomes the lower portion of the beak. Then draw another parallel line above it to indicate the mouth. Finally draw a third parallel line above to form the top part of the pelican’s beak. Draw a small bump near the front end of the beak and a small slit near the top for the nostril.
Step 9: Below the pelican’s beak, draw the trademark pouch. Start with quick, short strokes near the head. Then attach it to the neck. The pouch is empty, so draw a few lines that indicate the folds of loose skin and then attach it to the pelican’s beak.
Step 10: Using the initial lines as guides, draw the pelican’s neck by using quick, short strokes to represent feathers.
Step 11: Draw the body using the initial oval shape as a guide. Draw a few angled lines on the left side to indicate feathers and leave a small portion near the bottom blank where the pelican’s feet will go later.
Step 12: Draw the wing inside the body using a series of curved lines. Draw small curved lines that resemble the letter J to represent the pelican’s feathers near the bottom of the wing. Draw a couple more rows of J’s to add more detail to the wing.
Step 13: Draw the tail on the lower left side of the pelican’s body. The tail is short and stubby, so only use a few curved strokes to add it. Draw a few lines to the pelican’s chest for detail.
Step 14: Use the initial line as a guide to draw the pelican’s feet. Draw around the guide making the foot thicker, then draw the webbed toes at the end. Draw only a portion of the pelican’s other foot since most of it isn’t visible.
Step 15: You can stop here for a sketchy look or erase as much as you can of the initial guide lines for a cleaner look. Don’t worry about erasing all the guides. It’s okay to leave some behind. Also re-draw any final sketch lines you may have erased.
Step 16 (optional): Add some shading to give your pelican drawing more dimension and volume. Pick the direction of the light source when shading so that the shadows are consistent with it. Vary the pressure on your pencil to get different degrees of tonal value. It’s a good idea to use reference to be as accurate as possible.
Step 17 (optional): Add a cast shadow underneath. This helps ground the pelican so it doesn’t appear to be floating.
Step 18 (optional): You can add more shading throughout your pelican drawing for extra detail.