
 (1 votes, average: 4.00 out of 5)
How to Draw an Elephant
Please PAUSE the video after each step to draw at your own pace (scroll down to see the final elephant drawing).
For the first few steps, don’t press down too hard with your pencil. Use light, smooth strokes to begin.
Step 1: Draw a big oval as a guide for the elephant’s body.
Step 2: Draw a circle next to the oval as a guide for the elephant’s head.
Step 3: Draw two intersecting lines inside the elephant’s head to help you place the facial features later on.
Step 4: Draw a long curved line next to the elephant’s head as a guide for the trunk.
Step 5: Draw another curved line from the bottom of the head that intersects with the trunk as a guide for the elephant’s tusk.
Step 6: Draw a big arc to the right of the head that extends onto the body for the elephant’s ear.
Step 7: To the right of the elephant’s body, draw a small curved line for the tail.
Step 8: Below the elephant’s body, draw four straight lines as guides for the legs.
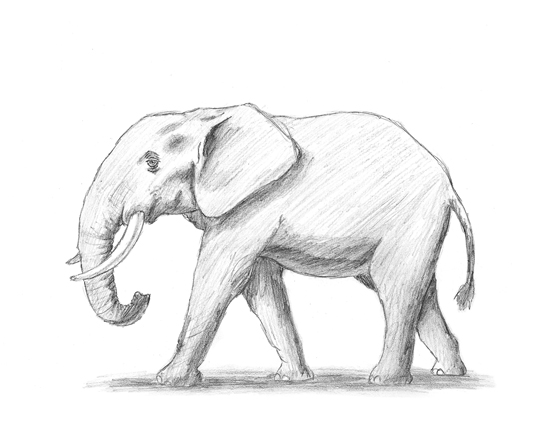
That’s it for the initial sketch of the elephant! From this point on, press harder with your pencil for a more defined sketch.
Step 9: Draw the elephant’s eye using the guides for placement. The eye is just a half circle with another shaded half circle inside for the pupil. Elephants are wrinkly, so draw a few lines around the eye to represent this.
Step 10: Use the guide line to draw the elephant’s tusk and mouth. Simply thicken the line and end it at a point. Draw the folds of skin at the base of it and the bottom lip next to it.
Step 11: Use the guide line to draw the elephant’s trunk. The trunk shouldn’t be smooth. Draw it with a few bumps all around. Draw a few lines on it to represent the elephant’s folds and wrinkles. Draw the tip of the tusk that’s hiding behind the trunk too.
Step 12: Using the initial arc as a guide, draw the ear. This is an African elephant so draw the ear big. Give it an angled shape so it doesn’t look so round. Draw a few lines at the base of it to represent inner structure.
Step 13: Draw the rest of the elephant’s head using the remaining guides.
Step 14: Draw the elephant’s front legs using the lines as guides. Draw all around the guides using bumpy lines. Elephants have wide feet, so make the bottom part bulge out and draw a few arcs for the nails. Draw some finishing wrinkles at the joint and move on to the other leg. Draw the next leg in the same way. Don’t forget the elephant’s wide feet!
Step 15: Draw the elephant’s hind legs using the same technique as before. The right leg is hiding behind the left, so only draw the visible portion.
Step 16: Use the guide line to draw the elephant’s tail and draw the brushy part at the end of it.
Step 17: Using the original oval, draw the rest of the elephant’s body. Don’t draw with straight lines. Make them curve and bend throughout.
Step 18 (optional): You can stop here for a sketchy look or erase all of the initial guide lines for a cleaner look. Don’t worry about erasing all the guides. It’s okay to leave some behind and re-draw any lines that you accidentally erase.
Step 19 (optional): Add shading to give your elephant drawing more volume and dimension. Pick the direction of the light source when shading so that the shadows are consistent with it. Vary the pressure on your pencil to get different degrees of tonal value. Add a cast shadow underneath. This helps ground the elephant so it doesn’t appear to be floating.
Step 20 (optional): Elephants are wrinkly, so draw some extra lines all over it. Elephants are also gray, so you can add value throughout the body for extra detail. It’s a good idea to use reference to be as accurate as possible.