 (1 votes, average: 5.00 out of 5)
How to Draw an Eagle (Bald)
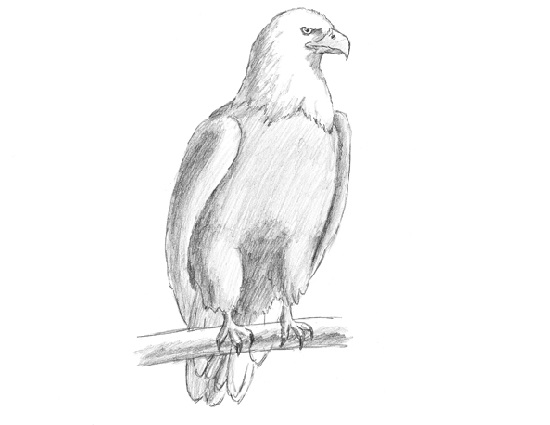
Please PAUSE the video after each step to draw at your own pace (scroll down to see the final bald eagle drawing).
For the first few steps, don’t press down too hard with your pencil. Use light, smooth strokes to begin.
Step 1: Draw a vertical oval as a guide for the bald eagle’s body. It doesn’t have to be perfect. It’s just a guide.
Step 2: Draw a smaller oval above the body as a guide for the bald eagle’s head.
Step 3: Draw an arc next to the eagle’s head as a guide for the beak.
Step 4: Draw two lines below the bald eagle’s body that split into three smaller lines as guides for the feet.
Step 5: Draw two curved lines that connect the bald eagle’s head to its body.
Step 6: Draw a big arc similar to the letter U at the bottom of the bird’s body as a guide for the bald eagle’s tail.
That’s it for the initial sketch! From this point on, press harder with your pencil to get a more defined sketch.
Step 7: Draw the eye inside the shape of the head. The bald eagle’s eye is basically a half circle with a thick angled line above it. Draw a smaller shaded circle inside for the pupil and darken the surrounding lines.
Step 8: Using the initial arc shape as a guide, draw the bald eagle’s beak. Make the top portion come to a point and have the bald eagle’s mouth extend inside the head shape. Draw quick, short strokes at the base of the bald eagle’s beak where it connects to the head and draw a nostril at the top of it.
Step 9: Shape the bald eagle’s head and neck using quick, short strokes to represent feathers.
Step 10: Draw the bald eagle’s feet by using the initial lines as guides. Draw a series of quick, short strokes around the base of each leg. Then draw the feet by thickening up the guide lines and shaping them. Draw the feet using bumpy lines. At the end of each toe, draw a curved talon.
Step 11: Draw the bald eagle’s wings on the sides of the body. The left wing starts below the neck and curves down behind the eagle’s tail. The other wing is hidden behind the bird’s body, so only draw the top portion of it.
Step 12: Now draw the rest of the bald eagle’s body by again using quick, short strokes.
Step 13: Using the initial arc as a guide, draw the bald eagle’s tail. Draw the bird’s tail using a series of overlapping short and long arcs within the shape.
Step 14 (optional): You can stop here for a sketchy look or erase as much as you can of the initial guide lines. Don’t worry about erasing all of them. It’s okay to leave some behind.
Step 15 (optional): Draw something at the bald eagle’s feet, like a rock, a ledge or even a flag, just so it doesn’t appear to be floating. Two lines also work as a branch.
Step 16 (optional): Add some shading to give your bald eagle drawing more dimension and volume. Vary the pressure on your pencil to get different degrees of tonal value. Pick the direction of the light source when shading so that the shadows are consistent with it.
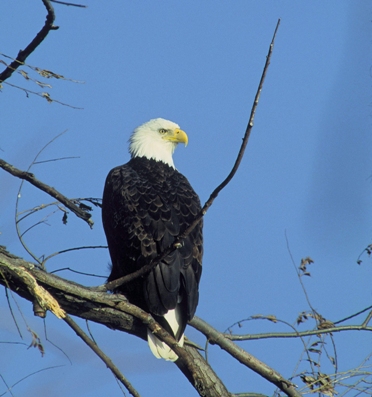
Step 17 (optional): You can add more value throughout your bald eagle drawing for extra detail. It’s a good idea to use reference to be as accurate as possible. Don’t add any value to the bald eagle’s head to keep the white (bald) look.