
 (1 votes, average: 4.00 out of 5)
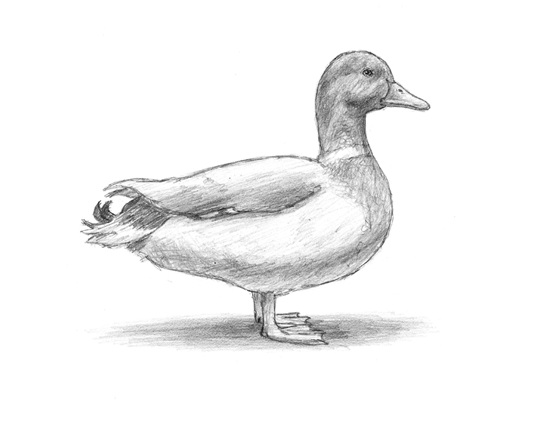
How to Draw a Duck
Please PAUSE the video after each step to draw at your own pace (scroll down to see the final duck drawing).
For the first few steps, don’t press down too hard with your pencil. Use light, smooth strokes to begin.
Step 1: Draw a circle as a guide for the front part of the duck’s body. The circle doesn’t have to be perfect. It’s just a guide.
Step 2: Draw a long arc on the left side of the circle to finish up the guide for the duck’s body. The end result so be a shape similar to an egg.
Step 3: Draw a small circle above the body on the right side as a guide for the duck’s head.
Step 4: Inside the circle, draw two intersecting lines. These lines will help you place the duck’s facial features later.
Step 5: Draw a small, thin arc on the right side of the head as a guide for the duck’s beak.
Step 6: Draw a couple of curved lines to connect the duck’s head to the body and form the neck.
Step 7: Under the duck’s body, draw an L-shaped line as a guide for the feet.
That’s it for the initial sketch! From this point on, press harder with your pencil to get a more defined sketch.
Step 8: Draw the duck’s eye on the upper right side of the head. The shape of the eye is similar to an oval with pointed ends. Shade in a small circle inside the eye for the pupil. Shade in the rest of the eye except for a small circle to represent glare. Draw a few lines on the outside for extra detail.
Step 9: Use the initial arc as a guide to draw the duck’s beak. Make the line curve a bit more as you darken it. The top part of the beak should be a little higher than the bottom of the arc. Shade in a small oval on the top as the nostril. Draw a line at the bottom for the lower portion of the duck’s beak.
Step 10: Darken the outer portion of the circle to form the duck’s head. Draw a few quick, short strokes inside for extra detail.
Step 11: Use the L-shaped line as a guide to draw the feet. Draw lightly at first to get the structure right. When you like what you have, go ahead and darken it. Ducks have flat webbed feet, so first draw three individual toes, then attach the webbing in between using curved lines. Draw the visible portion of the leg on the other side the same way.
Step 12: Use the top half of the body as a guide to draw the duck’s folded wing. The end of the wing sticks out and comes to a point. The bottom portion is made up of curved lines. Break up the bottom portion into smaller curved lines instead of one continuous line. Draw another point on the left side for the other wing.
Step 13: Use the initial lines as guides to draw the duck’s neck and body. Draw the chest sticking out more as you darken the lines. Be sure not to draw over the feet.
Step 14: Draw a series of curved and pointy shapes for the duck’s tail on the left side. Use quick, short strokes throughout the tail to represent the feathers.
Step 15 (optional): You can stop here for a sketchy look or erase as much as you can of the initial guide lines for a cleaner look. Don’t worry about erasing all of them. It’s okay to leave some behind. Also re-draw any final sketch lines that you may have accidentally erased.
Step 16 (optional): Add some shading to your duck drawing to give it more dimension and volume. Pick the direction of the light source when shading so that the shadows are consistent with it. Vary the pressure on your pencil to get different degrees of tonal value.
Step 17 (optional): Add a cast shadow underneath the duck. This helps ground the duck so it doesn’t appear to be floating.
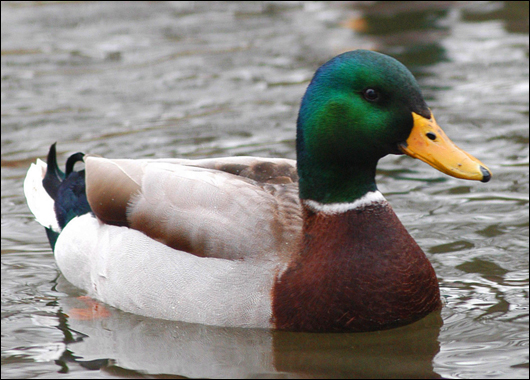
Step 18 (optional): You can stop here for a white domestic duck or add more value throughout your drawing for extra detail. Mallard ducks are the ancestors of most domestic ducks. To get a mallard look, add darker value to the head, wing tips and chest. It’s a good idea to use reference to be as accurate as possible when drawing your duck. And remember to PAUSE the video any time you need help along the way.