
 (1 votes, average: 4.00 out of 5)
How to Draw a Butterfly
Please PAUSE the video after each step to draw at your own pace (scroll down to see the final butterfly drawing).
For the first few steps, don’t press down too hard with your pencil. Use light, smooth strokes to begin.
Step 1: Draw a long oval as a guide for the butterfly’s body. The oval doesn’t have to be perfect. It’s just a guide.
Step 2: Draw a small circle on top of the oval as a guide for the butterfly’s head.
Step 3: Draw a triangle on either side of the body as a guide for the top portion of the butterfly’s wings or the forewings. Try to draw both sides similarly so your drawing has symmetry. To form the butterfly’s forewings, first draw the top lines, then the sides, then the bottom lines to create triangles. You can also start with the top lines, then do the bottom lines and end with the side. Whichever is easier for you.
Step 4: Draw the bottom portion of the butterfly’s wings or hindwings right below the top. The shape is similar to the letter U. Start at the corner of the forewing and end at the bottom of the butterfly’s body. Draw draw each side the same.
That’s it for the initial sketch! From this point on, press harder with your pencil to get a more defined sketch.
Step 5: Draw a curved line inside the circle for the butterfly’s head. Draw a few more lines inside for extra detail.
Step 6: Draw two half circles on top of the head for the butterfly’s compound eyes.
Step 7: Draw the top part of the head and the antennae as two curved lines on the butterfly’s head.
Step 8: Use the oval as a guide to draw the middle segment of the butterfly’s body or thorax.
Step 9: Use the lower part of the oval as a guide to draw the bottom of the butterfly’s body or the abdomen.
Step 10: Use the initial triangles as guides to draw the butterfly’s forewings. Bend the top part of the forewing for a more organic feel. Draw a series of curves and arcs for the sides of the butterfly’s wings and bend the bottom part a bit. Remember to draw each side the same for a sense of symmetry.
Step 11: Use the U-shaped lines as guides to draw the butterfly’s hindwings. Draw a series of wavy lines along the edge for a more organic feel.
Step 12: Draw a series of lines inside the forewings for the veins. Start with a curved line on top of the butterfly’s wing, then draw the rest of the veins below. Pause the video as you follow along to accurately draw the butterfly wing’s veins. Whatever you draw on one side of the butterfly, be sure to also draw it on the other side for a symmetrical look.
Step 13: Draw a series of lines inside the butterfly’s hindwings for the veins. Start with a long U-shaped vein on each side, then draw the remaining veins attached below it.
Step 14 (optional): You can stop here for a sketchy look or erase as much as you can of the initial guide lines for a cleaner look. Don’t worry about erasing all of them. It’s okay to leave some behind. Also re-draw any final sketch lines that you may have accidentally erased.
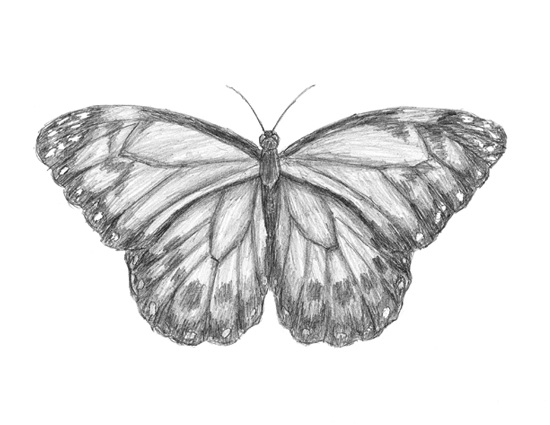
Step 15 (optional): Add some value throughout your butterfly drawing for extra detail. This is the basic shape for most butterflies, so you can add different amounts of value to get the wide varieties of patterns on butterflies. Vary the pressure on your pencil to get different degrees of tonal value. Use reference when adding value for accuracy on the pattern of the wings. Your butterfly can be a monarch, a blue morpho or one of your own design! You can draw spots, dots, stripes or anything else you want when designing your own patter. Be creative! Don’t forget to PAUSE the video any time you need help along the way.