
 (1 votes, average: 5.00 out of 5)
How to Draw a Bison
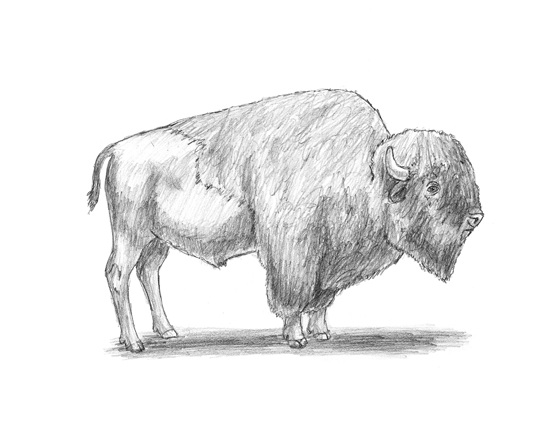
Please PAUSE the video after each step to draw at your own pace (scroll down to see the final bison drawing).
For the first few steps, don’t press down too hard with your pencil. Use light, smooth strokes to begin.
Step 1: Draw two circles as guides for the bison’s body. They don’t have to be perfect. They’re just guides. The circle on the right will be a guide for the bison’s big chest, so it should be a lot bigger than the circle on the left.
Step 2: Draw another circle on the right side as a guide for the bison’s head. The circle should be about the same size as the circle on the left side. It should also overlap the big circle a tiny bit.
Step 3: Draw two intersecting lines inside the bison’s head to help you place the animal’s facial features later on.
Step 4: Draw four angled lines under the body (two below each circle) as guides for the bison’s legs.
Step 5: Draw a series of curved lines that connect the major shapes to form the bison’s body.
That’s it for the initial sketch! From this point on, press harder with your pencil to get a more defined sketch.
Step 6: Draw the eye inside the bison’s head using the lines as guides for placement. The shape of the eye is similar to a football. Draw a circle inside of it for the eyeball. Shade in the bison’s eyeball except for a small circle to represent glare. Draw some lines surrounding the eye for extra detail.
Step 7: Draw the curved horn on the upper left side of where the guide lines intersect. The shape of the bison’s horn is similar to a fat letter L. Draw quick, short strokes at the base to represent this animal’s fur.
Step 8: Draw the bison’s muzzle outside of the circle, on the lower right side. Draw a shape similar to an upside-down triangle for the nose. Draw an angled line inside for the nostril. Draw two short lines below the nose for the bison’s mouth.
Step 9: Draw a curved line under the horn for the bison’s ear. Draw a small line within the ear for structure.
Step 10: Use the circle as a guide to draw the rest of the bison’s head. Use quick, short strokes around the head all the way to the top of the nose to represent fur. The strokes at the bottom should dip below the circle to form a long, shaggy beard. Draw more quick, short strokes inside the head to represent fur on the bison’s face.
Step 11: Using the lines as guides, draw the bison’s hind legs. Draw lightly at first. When you like what you have, go ahead and darken it. Make the leg thicker on top and draw some bumps along the way to represent joints. Draw a couple of lines at the bottom for the hoof. Draw the leg on the other side the same way. Draw lightly at first to get the structure right, then darken it. Don’t forget to draw the bison’s hoof!
Step 12: Draw the bison’s front legs using the initial lines as guides. The upper part of the leg is covered with a shaggy coat, so draw the top part thicker and use quick, short strokes to represent fur. Remember to draw lightly at first. Draw the bison’s foot below the fur and draw the hoof. Draw only the visible portion of the other leg the same way.
Step 13: Use the initial lines as guides to draw the bison’s body. Bison have a thick coat covering the front part of their bodies, so use quick, short strokes to represent this. The shaggy coat extends from the back down to the front legs.
Step 14: Using some lines, draw the tail on the left side of the bison’s body.
Step 15 (optional): You can stop here for a sketchy look or erase as much as you can of the initial guide lines for a cleaner look. Don’t worry about erasing all of them. It’s okay to leave some behind. Also re-draw any final sketch lines that you may have accidentally erased.
Step 16 (optional): Add some shading to your drawing to give it more dimension and volume. Pick the direction of the light source when shading so that the shadows are consistent with it. Vary the pressure on your pencil to get different degrees of tonal value. Add a cast shadow underneath. This helps ground the bison so it doesn’t appear to be floating.
Step 17 (optional): You can add more value throughout your bison drawing for extra detail. It’s a good idea to use reference to be as accurate as possible.