
 (1 votes, average: 3.00 out of 5)
How to Draw a Bee
Please PAUSE the video after each step to draw at your own pace.
For the first few steps, don’t press down too hard with your pencil. Use light, smooth strokes to begin.
Step 1: Draw a circle as a guide for the upper part of the bee’s body or thorax. The circle doesn’t have to be perfect. It’s just a guide.
Step 2: Draw an oval on the left as a guide for the bee’s head. The oval should be placed lower than the first circle, and it should be a bit shorter in length.
Step 3: Draw two circles as the first part of the guide to draw the back portion of the bee’s body or abdomen. The circles should gradually get smaller. They should also be placed gradually lower. The four shapes should end up forming a bit of an arc.
Step 4: Finish off the guide for the bee’s abdomen by connecting the two circles. On the right side, draw a couple of lines that resemble a triangle.
Step 5: Draw a long U-shaped arc that connects the bee’s thorax and abdomen and serves as a guide for the wings.
Step 6: Draw a series of angled lines below the thorax as guides for the bee’s feet. Pay attention to the way the lines angle because this will dictate the final direction of the feet. Remember to pause the video if you need help drawing the guide lines for the feet.
That’s it for the initial sketch! From this point on, press harder with your pencil to get a more defined sketch.
Step 7: Draw the big compound eye inside the bee’s head. The shape of the eye is similar to the bee’s head, only shorter and thinner.
Step 8: Draw the antennae on the left side of the bee’s head. First draw a line similar to an upside-down letter L. Then make the line thicker to form the first antenna. Now do the same for the antenna on the other side, but make it smaller and thinner.
Step 9: Use the original oval as a guide to add the furry hair to the bee’s head. Follow the path of the oval and add the hair using quick, short strokes for a fuzzy look.
Step 10: Draw a series of lines under the bee’s head for the mouth parts. Bee mouths are very complex. This is a simplified version to make drawing the mouth easier. First draw a pointy shape for the mandible and to the right of that, a long thin shape for the tongue. You can divide the tongue or proboscis into three segments for extra detail.
Step 11: Use the initial U-shaped arc as a guide to draw the bee’s wings. First draw a wavy line as the base for the wings. Then darken the path of the line and tighten the shape of the forewing. Make the end of the wing pointier. The base of the wing should be thinner and the top wider so it looks like a long triangle. Now draw the wing in the back, or the hind wing, right below the first one. The shape is similar to the forewing but smaller. For the sake of simplicity the bee’s wing on the other side was omitted, but you can draw it peeking from behind if you’d like.
Step 12: Draw the bee’s legs by using the angled lines as guides. Follow the path of the line as you make the leg thicker. Add lines at the joints to divide the leg into segments. Notice how the segments of the legs are not one thickness throughout but vary in girth from one end to the other. Draw two tiny claws at the end of the foot. Use the line in the middle to draw the middle leg. Add an extra segment at the top that angles to the left and connects to the thorax. Continue drawing the legs in segments and add the two little claws at the end of the feet. Use the final angled line as a guide to draw the hind leg. The bee’s hind leg is the biggest, so draw the segments thicker. Remember to make each individual segment vary in thickness. Draw the thin foot at the end with tiny claws.
Step 13: Draw the bee’s fuzzy thorax by using the initial circle as a guide. Just follow the path of the circle using thick, short strokes to create the tiny hairs.
Step 14: Use the initial circles and lines as guides to create the bee’s abdomen. Have the end of the abdomen come to a point for the stinger.
Step 15 (optional): You can stop here for a sketchy look or erase as much as you can of the initial guide lines for a cleaner look. Don’t worry about erasing all of the guides. It’s okay to leave some behind. Also re-draw any final sketch lines that you may have accidentally erased.
Step 17 (optional): Add a few lines within the bee’s wing for extra detail and the legs on the other side for structure. The wing is mainly see-through, so don’t worry about making the shapes inside perfect. You can add the bee’s legs on the other side for further structure. Don’t add too much detail to them.
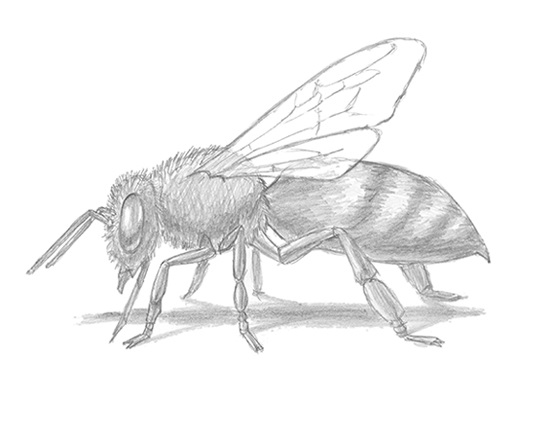
Step 18 (optional): Add some shading to your bee drawing to give it more dimension and volume. Pick the direction of the light source when shading so that the shadows are consistent with it. Don’t make the shading too smooth. The rough edges indicate the bee’s hairy body. Vary the pressure on your pencil to get different degrees of tonal value.
Step 19: Add a cast shadow underneath. This helps ground the bee so it doesn’t appear to be floating.
Step 20 (optional): You can add more value throughout your bee drawing for extra detail. Don’t make the added value too smooth. The rough, textured value gives the bee a fuzzy appearance. Alternate between a dark value and a light value in the abdomen to give the bee the classic stripes. It’s always a good idea to use reference for accuracy, and remember to pause the video any time you need help along the way.